STEM your science activities! It’s easy. Just add technology, engineering, and mathematics. Voila! Your science lesson is transformed into a STEM activity.

Posts on this website follow a teaching journey and are written in story form.
Ms. Sneed Plans STEM Science Activities
Our favorite fourth grade teacher sat at the side table with her teaching partner. “At the last staff meeting, the principal encourages us to ramp up scientific thinking with STEM activities,” she said. “But what does that mean? Should we do more engineering design challenges?”
As usual, Mr. Frank flipped his laptop open and began to click around. “Hmm. In Six Characteristics of a Great STEM Lesson, Anne Jolly lists the four parts of the acronym.” He turned the screen so Ms. Sneed could see.
- Science – the study of the natural world
- Technology – a product made to address a need
- Engineering – using the design process
- Math – numbers, operations, measurement, geometry, algebra, etc.
“Wow, engineering design is only one part of it,” Mr. Frank said. “Maybe we can create STEM science activities.”
“We’re right in the middle of our sound unit. How can I pull this off?” asked Ms. Sneed
As she spoke, Mr. Frank nosed around for sound activities on Pinterest. “An idea is forming in my head,” he said. “Maybe we can ask them to solve a need right here in our school…”
STEM Science Activity – Building a Musical Instrument
The following Monday, Ms. Sneed was ready to put their plan into action. When her students filed in, her first STEM science activity was ready to go.
The S in STEM – Science
“Good morning, class!” said Ms. Sneed. “To deepen your understanding of pitch, you will participate in a STEM activity. That means we’ll integrate science, technology, engineering, and mathematics.”
The T in STEM – Technology
“Our kindergarten classes are also studying sound. For their exploration, they need musical instruments that produce high, medium, and low sounds. Their teachers asked if you would design some for them.”
The E in STEM – Engineering
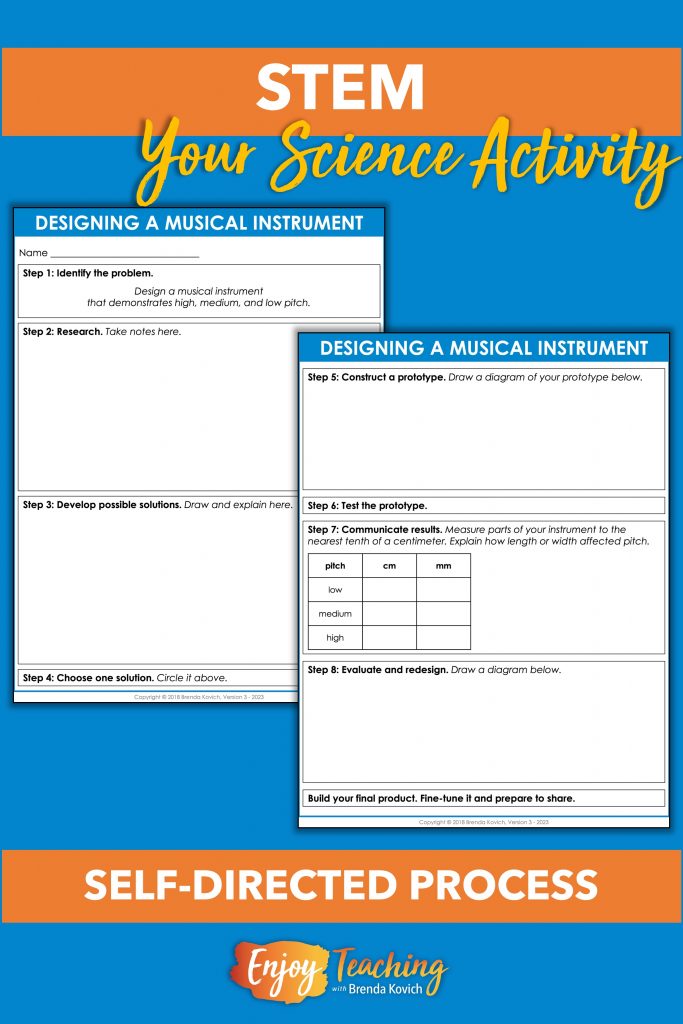
“You will use the engineering design process to build the musical instrument. Let’s review the steps.
- First, kids define a problem with criteria and constraints.
- Second, they may conduct research.
- Third, they generate solutions and choose one.
- Fourth, students develop a prototype.
- Fifth, they test the prototype with a fair test in engineering.
- Finally, they communicate results. And often, they’ll evaluate, redesign, and use the engineering design process all over again.”

Criteria and Constraints
“In engineering, people first define a problem with criteria and constraints. I’ve already explained the problem: kindergartners need musical instruments. Additionally, I’ve mentioned the criteria, or what the instrument needs. Each one must have high, medium, and low pitch.”
As she spoke, Ms. Sneed walked to a table where various materials are displayed. “Constraints are limitations. For this project, you may use any material on this table to create your instrument: screws of different lengths and widths, toilet paper tubes, straws, craft sticks, rubber bands, string, and tape. But that’s it. Resources for this project are scarce.”

Using the Engineering Design Process
Next, Ms. Sneed distributed a two-sided worksheet. “This page will take you through the engineering design process. You must complete the first four steps before gathering your materials:
- Identify the problem. (This has already been completed for you.)
- Research. (I suggest you search images of handmade or DIY musical instruments.)
- Develop possible solutions.
- Choose one.
“Just show me your lab sheet when you’re ready. Then you can build your prototype.”
The M in STEM – Mathematics
“When your musical instrument is finished, you will test it. First, you must measure each component of your instrument. Will you use inches or centimeters?”
A hand popped up in the middle of the classroom. “As you’ve told us a million times, scientists use the metric system. So we’ll use centimeters.”
“Yep. And while you’re at it, measure to the tenth of a centimeter – and convert that to millimeters as well.” The class groaned.
“Write the dimensions on your lab sheet. Then you can use an online oscilloscope to visualize the frequency. I’ve sent you the link.”
The Kids Get Busy
As Ms. Sneed circulated around the room, she noticed that one group used different lengths of straws to build a pan flute. Another group made a trio of harmonicas with craft sticks, straws, and rubber bands. Yet another built wind chimes with screws. Ms. Sneed also visited a group that cut toilet paper tubes and rolled them into different widths.

“This is fun,” a student shouted. “Can we do STEM science activities again?”
Ms. Sneed’s eyes twinkled. Next, she would break out the roller coaster design activity.
Ms. Sneed and Mr. Frank Debrief
At lunch, the pair of teachers met in the teacher’s lounge. “How did your STEM science activity go?” Ms. Sneed asked.
“Fabulous! My students’ creativity was at an all-time high.”
“Same. I loved it. Let’s do one of these projects for each of our units! We just have to remember: S for science, T for technology, E for engineering, and M for mathematics.”